This time I had thought I would showcase my work
only on my facebook page. But then I realized that there are a lot of people
who may not be on facebook. So I decided to write this post as well.
I would like to note that most of the post is only
going to be pictures with some minor descriptions of the method where needed.
So the fevicryl hobby ideas group sell this clay
called shilpkar. It is basically a white m-seal with 2 parts (resin base and
hardener). The idea is to combine equal parts of the two by halving and rolling
it again and again until it turns into a smooth uniform coloured mixture. Then
you can shape it as you please. Although the box says that its non sticky,
since I was using it for the first time I found it pretty sticky. I also bought
some plastic tools in their shop to work with the clay. To roll the clay I used
an old deo bottle (since I didn't want to use the chapati roller). I covered
the deo bottle and the wooden base I was using with some parchment paper so
that it would not stick to the clay and this worked. For the magnetic part, in
some of the magnets I used regular small round magnets while in most of the
others I used cut out bits from an adhesive magnetic sheet. Both of these I
bought online on Amazon.

1. Warli art magnets

I have been fascinated with warli art off late.
And decided to give an ode to that with magnets. I have used a square cut out
of adhesive magnetic sheet which I have topped with a think layer of clay. For
the border, I have attached thin tubes of clay and made a small groove in them
at specific intervals. I have then painted it with fevicryl pearl and acrylic
colours.
2. Minion magnets


This one is of the minion in a girl disguise. If
you have seen the movie Despicable Me (part 2), this cute one has been picked
up from there. I drew this figure on the magnetic sheet, cut it, topped with a
thin layer of clay and painted it.

My take on Humpty Dumpty meets a minion. It is a
similar procedure but added a thicker layer of clay and to give it a semi 3D
kind of effect added hands and feet too. The rest is just painted on.

The method of this is similar to the girl in
pigtails. Only a different figure drawn and cut out on the adhesive sheet and
painted differently.

This is another semi 3D magnet.
Here though, to a
thin layer of clay I have carefully added the bits of clay to form the hands
and shoes, overalls, pockets and the glasses.
In hind sight I should have added
a layer to form the face and topped that with glasses.
3. Camera:

This was a fathers day gift to my father in law.
Having lost my father seven years ago, this was a special fathers day for me. I
got married end of December last year and hence was celebrating fathers day
after seven whole years with my father in law. And since he is such a gem of a
person, I wanted to make something special for him. This was around the time I
was making all these magnets so decided to make a couple for him. He is a very
passionate photographer. Those who know him will know that on holidays and
whenever he is relaxed, he will always have his precious camera around his
neck. So decided to try to model it out for him.
Its difficult to explain the procedure for this. I
used a small rectangle of the magnetic sheet. I kept topping it with little bits
of clay to achieve the different parts of the camera. I painted it also based
off an image on the internet. The only difference was that I used glass colours
to paint the lens to give it the glassy effect. I was a bit clumsy though while
writing the model and company of the camera.
4. Stethoscope:

This was also for fathers day since my father in
law is a Doctor. To an oval piece of clay, I added thin tubular bits of clay to
make it look like a stethoscope.
5. Purse magnet:

Since I was making the magnets for my father in
law I decided to make this purse magnet for my mother in law. I cut out the
figure of the purse from the magnetic sheet. I topped this with a thin layer of
clay. Added another layer of clay for the flap and a small round bit for the
clasp.
6. Some cute creatures:


For the main part of the snail, I added a thin
layer of the clay to the cut of from the magnet sheet. For a slight 3D effect
for the shell, I topped smaller oval pieces of clay to the main part. I also
added a small round bit for the eye.

The central portion and head of the butterfly is
3D. But the rest is just a thin layer of clay. I have however made round
depressions in the wings before painting them.
7. Food magnets:


Fries anyone? Have shaped pouch like thing with
clay and after it was dry I added the back portion. To the back portion while
wet I added the round magnets. This saves effort to stick the magnet after it
is dry. Also, the magnet does not jut out. The fries are just small rectangular
tubes shaped like fries and painted so.
 Donut love. I cut out a donut shape from the
adhesive sheet. To this, I added a thick round tube of clay. After this was
dry, I topped it with a thin donut shaped layer to form the chocolate
sauce.
Donut love. I cut out a donut shape from the
adhesive sheet. To this, I added a thick round tube of clay. After this was
dry, I topped it with a thin donut shaped layer to form the chocolate
sauce. 
Simple 2D tomato magnet. The only addition to this
was the stalk I added on top.

Watermelon slice. Simple 2D magnet. Cut out a
thick semicircular piece of clay and painted it so.
8. Flower magnets:

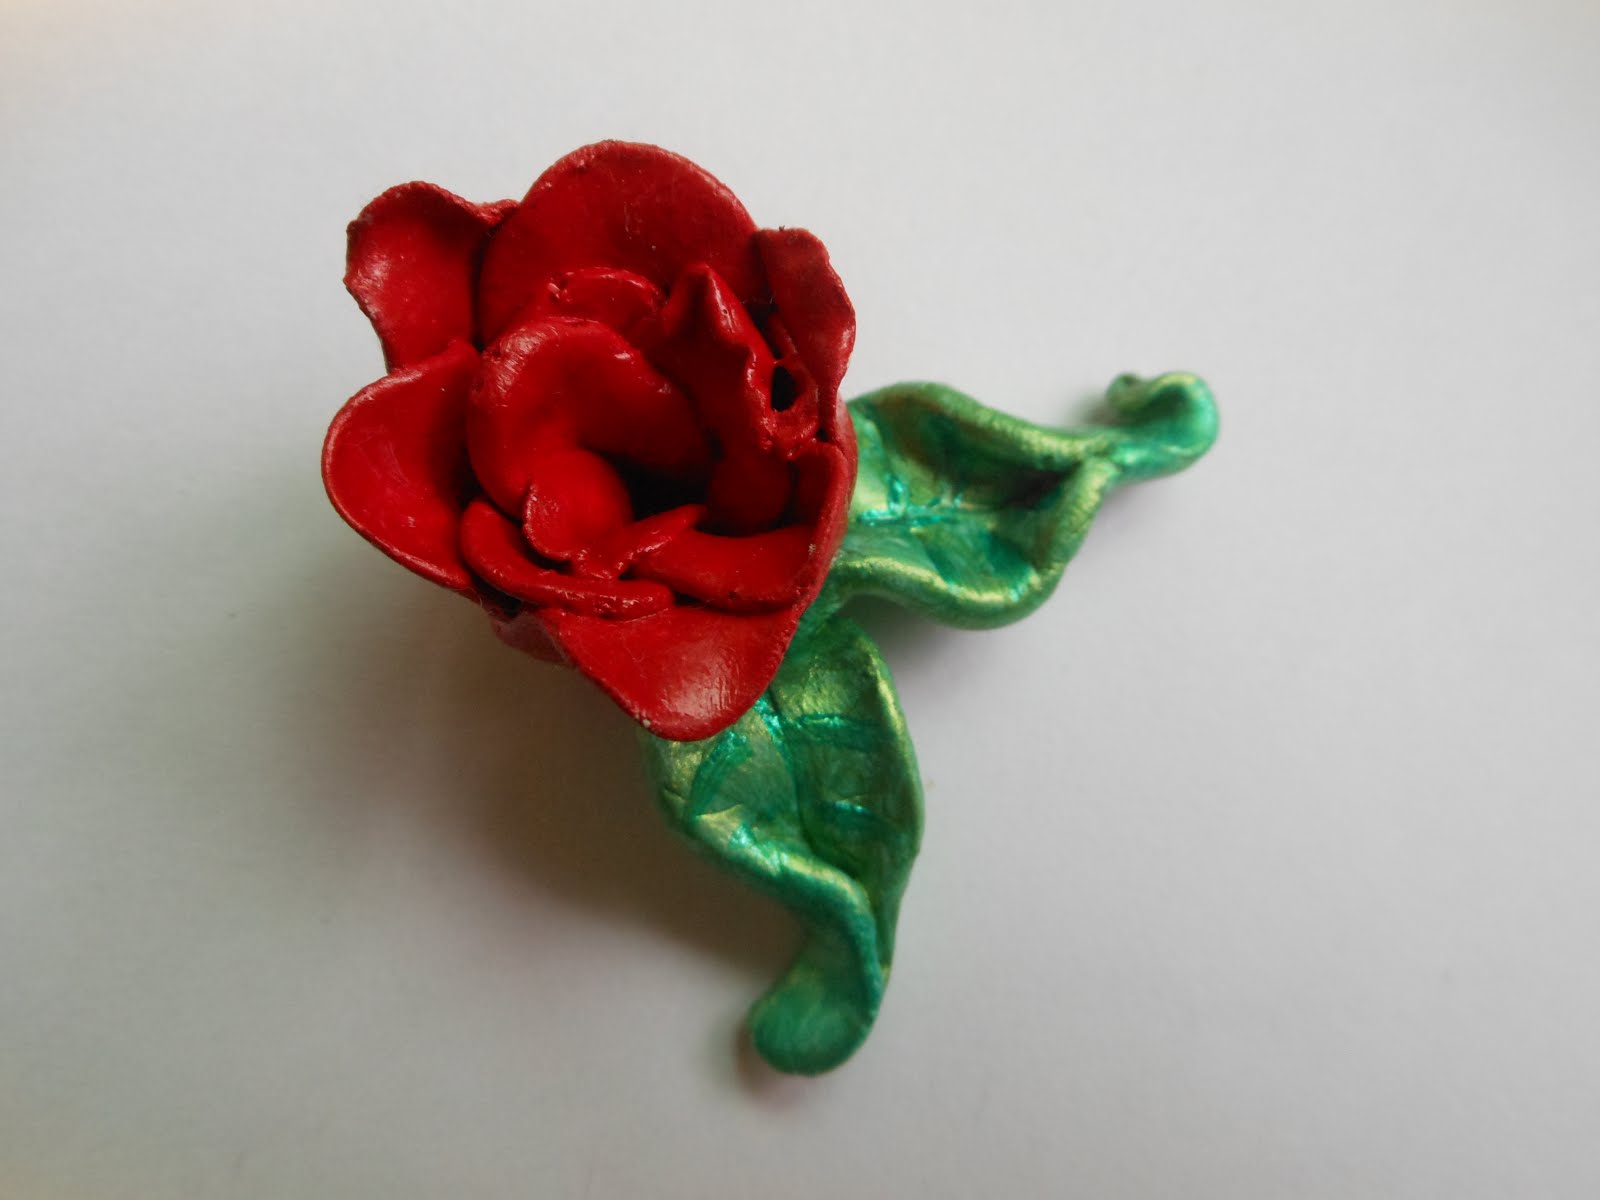
Rose. I have used a round magnet covered on 3
sides with a piece of clay (one flat side should be open). To this I have added
the petal layers of clay. I have then shaped out leaves and stuck it to the
sides.
 To a small round bit of magnetic sheet, I have
covered the periphery with little balls of clay. I have then made a groove in
the ball with a clay tool and then added another flattened ball of clay in the
centre. I have used a sharp tool to make dots in the central part just to give it a nice effect. I have added leaves to top it off at the side making sure the magnet is
not covered.
To a small round bit of magnetic sheet, I have
covered the periphery with little balls of clay. I have then made a groove in
the ball with a clay tool and then added another flattened ball of clay in the
centre. I have used a sharp tool to make dots in the central part just to give it a nice effect. I have added leaves to top it off at the side making sure the magnet is
not covered.
Do let me know in a comment which was your favourite magnet. Since I am new at this some of them might not be too clean. But if you like my work do follow my blog.
No comments:
Post a Comment