First of all, I'd really like to thank my friends and family for the
wonderful response I got on my previous post. I didn’t expect this
response and the interest I got from others on this project of ours.
In this post, I am going to go into details of how my mom
and I made the living room.

So for the room design, my mom used some pink handmade paper
for the floor. For the walls she used some gift wrapping paper with pink
hearts. Don’t miss the little bell in the top left corner which my mom tied
with string. The doll house has to after all have a door bell for visitors
right? ;P One thing which I must mention here is that the entire doll house has
a removable back with screws. The carpenter made it this way at my mom’s
request so that it was easy for us to handle and transport to my cousin’s
house. Thanks to this she could also tie the bell and then attach the back
wall.
Coming to the furniture, I mostly used cardboard and some
boxes for the framework of each part. In the living room you can see the
following furniture- there are two sofas, a single one and a double seater, a
side table, a rug, a fire place and a TV. So let’s look into each part
individually.
1. Single seater sofa:
Things you need: Thermocol cup, some foam, a piece of
scotchbrite sponge wipe, bits of cloth (I used some maroon cloth), glue, paint
and scissors (pictures of raw materials are from the internet just to give an
idea)


I don’t remember where I had learnt this little trick. Maybe
it was in a school art class or some book I had read. But when it came to
making the sofa, I remembered that I could cut the thermocol cup into the shape
of a sofa and fill it with sponge for the cushions.

Step one was to cut
the cup into the shape you can see in the picture. As you can also see, I stuck
the piece which I cut into the back of the cup. I did this so that the sofa has
better stability. Following this I painted the whole thing brown (this was
before my mom reminded me that I am making this for a little girl and I should
not use drab colours- most of the other pieces have bright colours).
Then, I measured and cut the foam into bits which correctly
fit into the circular part in the centre. Once I was done cutting, I covered
this bit of foam with the maroon colour cloth and made the cushion. For the
back cushion I did something similar. However, instead of using foam, I used
some new scotchbrite sponge wipes (the kind you would use to wipe the kitchen
counter).
Finally, I wanted my sofa to have a throw pillow on top so I
again used a small circular piece of foam but this time wrapped it in a
slightly different coloured cloth for better contrast.


2. Double seater sofa
Things you need here and steps are pretty similar to those I
mentioned above. Only instead of the thermocol cup I used a box which had come
with a perfume. First of all, I cut it into the below shape.


Like I said, the rest of the steps are pretty similar. I cut
foam for the seat cushion and I cut sponge wipes for the back cushion. I used
similar colours so it would look like a set.

Finally, I painted it the similar shade of brown. My mom
made the throw pillows for this one. She used square bits of sponge wipes which
she stitched together. She said it looked good as it is and it didn’t need a
cover of cloth. Here’s the final sofa.

Like I said, once I painted it the cellotape gave it a messy look
which couldn’t be helped (I had already put in too much work into it and wasn’t
ready to redo it).
3. Side table:
This was the easiest bit of furniture ever. I had a noise
maker lying around at home which we got from a recent trip to Thailand. It had
a small cylinder closed at one end which was tied with string. I used the
cylindrical portion and just painted it red. As simple as that.
Here it is, my final end table.

4. Rug:

I have two rugs in the doll house and both were made
differently. So for the one in the living room the credit goes to mom. She
stitched bits of cloth in a concentric circular pattern to look like this.
The second rug I will discuss when I blog about the bedroom
furniture.
5. TV:
For the flat screen TV, I stuck two identical pieces of
rectangular cardboard and painted it black. For the borders I folded some bits
of paper which I had painted black and stuck it to the four borders (If you
look at your TV carefully you can see that the borders are a bit higher).

To make it more real and natural I also gave it a brand (I
chose SONY because it was a four letter word and easier to write on a miniature
TV). I also painted a small bit of string black and stuck it to the back of the
TV to make it look like the power cord. Rather than have a blank screen, I cut
a small piece of picture from a desk calendar and stuck it to the screen to
make it look like there was a show on. I stuck the final TV to the wall of the living room.
6. Fireplace:
This part of furniture is one of my most prized masterpieces
in the doll house.


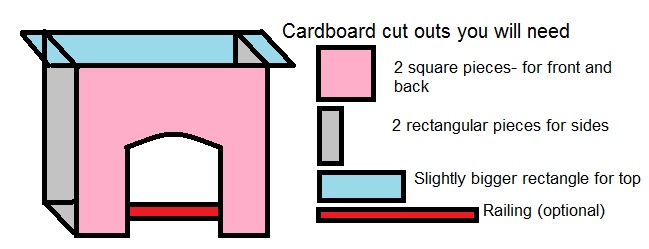
My first task was to build the framework. I cut out
cardboard in different shapes and painted it black. I cut two big squares for
the front and back. But for the front I cut out a dome shaped portion from the
square. I connected these two pieces with two rectangular pieces on each side
and also attached a rectangular piece of cardboard at the top for the
mantelpiece. In the front opening I attached a thin strip of cardboard to make
it look like a railing. All this might be confusing so I have drawn a framework
to indicate what piece goes where.
Now one would think that this looks like a fireplace
already. However, I was not completely satisfied. I wanted to add some more texture
to it. At first I thought I collect some pebbles and stick it to the front so I
would get the look of a stony fireplace. Whenever I went to pick pebbles I
never seemed to find the right sort. So again, I had to improvise. To be honest
the solution I came up with was less messy and gave me a lot of satisfaction as
to the result.
So what I used was…. Wild guess anyone? A recurring material
in all my furniture- scotchbrite sponge wipes. So to each of the sides I stuck
a corresponding piece of the sponge wipes and then to give it the stony
structure I just used a pointy object to make grooves into the sponge. And the
final product…. Voila!

Now I chose to paint the sponge pink. But that is totally up
to the discretion of anyone. If someone thinks a grey colour would make it look more natural and give it a stony appearance,
then they can go with that. I also wanted to cut small pieces of sticks and
place it in the fireplace to look like wood. But I actually forgot by the end since
we were really short of time before my niece’s birthday.
I also made two picture frames with cardboard and stuck some
tiny pictures in it to make it look like a natural mantelpiece.
So that’s it with part 2 of my doll house. I hope you all
enjoyed reading it. Do let me know if you have any suggestions or comments in
the section below.
Great going Shruti! Looking forward to more posts :)
ReplyDeleteThanks a ton!
Delete